My Canaries Are Nesting

DSC_0009.JPG

I got a cute little male canary last year in trade for some button quail and I just love him. Canaries have so much personality for such little birds! (So much so that I wrote a comic strip about them for a local newspaper years back for nearly half a decade.)

This little guy would sing all day and even let me know when the food dish was empty with his little scolding voice. I decided this year it was time to get him a girlfriend and was able to find a lovely little white hen who is part Gloster.

They got along right away and lost no time in making a nest. Today I looked inside and there are two tiny, speckled blue eggs. I’m smitten!

DSC_0005.JPG

DIY Convertible Screened/Solid Bottom Board

DSC_0004.JPG

I mentioned in the previous post how I didn’t really like the screened bottom board options available to me locally, not to mention the fact that they were all very expensive. All the designs I saw online seemed overly complicated or had what I perceived as flaws.

I have a lot of raw cedar boards left over from fencing my yard, and I figured this was a great way to use some of them up. Not to mention this is a very simple design that doesn’t require any rabbets.

DSC_0002.JPG

Solid bottom board base

I had seen a bottom board similar to this on the University of Guelph’s beekeeping videos on Youtube, but couldn’t find instructions to build them anywhere. It’s a two-part design that can be used either as a solid bottom board, or as a screened bottom board with mite collection tray. My design is a little bit different from theirs as I’ve incorporated a small landing strip. It’s not necessary for the bees but I like the look of it.

The unit consists of a simple solid bottom board made from two 1 by 2 by 21 1/4″ rails and a 1 by 2 by 14 5/8″ back rail. (These are all exact dimensions, I’m not using dimensional lumber for this.) I used 3/4″ thick boards for the base but you could also use plywood. It’s assembled with screws, nails and glue. The two inch entrance is a bit large, but it can be made smaller with an entrance reducer. The reason I kept it at two inches, is that I’ve read you get a better mite kill if they fall at least two inches down.

DSC_0007.JPG

Screened top piece

The second piece is a separate screened insert made from two 1 by 1 by 21 1/4″ rails and two 1 by 1 by 16 5/8″ rails, with a piece of 15 3/4″ by 21 3/8″ hardware cloth stapled to it (also known as #8 or 1/8″ galvanized or stainless steel mesh). I stapled the mesh to the long sides and back first, then screwed on the “landing porch” rail and stapled the mesh down well along the lip. If you go over the mesh edge and staples well with a hammer it presses it down into the wood giving you a relatively smooth entry point.

DSC_0006.JPG

Back view with screen installed and quality control crew

The genius of this design is that to use it as a screened bottom board, you simply turn the solid board around and place the screen on top. The old solid board entrance now becomes the back where you can insert your mite board or oil pan. Since the wood edges are all flush, there’s no lip under the mesh for the mites to land on and crawl back up, an issue I’ve noticed with a lot of other designs.

I will most likely use recycled plastic core-flute (coroplast) for my mite boards, and screw another piece of cedar to the edge of them to cover most of the back opening and serve as a removal handle. The large two inch space would allow you to fit a large metal roasting pan underneath filled with oil if desired. You don’t want to leave the two inch gap at the back wide open as bees have been known to build mini-hives under the screen in that space! You’ll also want to make sure the unit sits on some kind of stand so the flat bottom board is not in direct contact with the ground where it can wick up moisture.

I really like the versatility and simplicity of this design, and I love that I’m only really paying for the cost of the mesh and hardware. I finish the bases off with a few coats of tung oil and they’re ready to install!

DSC_0001.JPG

With screened board installed

DSC_0003.JPG

DSC_0004.JPG

With screen removed

Spring Bee Hive Cleaning

DSC_0044.JPG

We finally had a nice enough day for me to open up all my hives, go through each frame and tidy everything up. It took a good hour per hive, but was very informative!

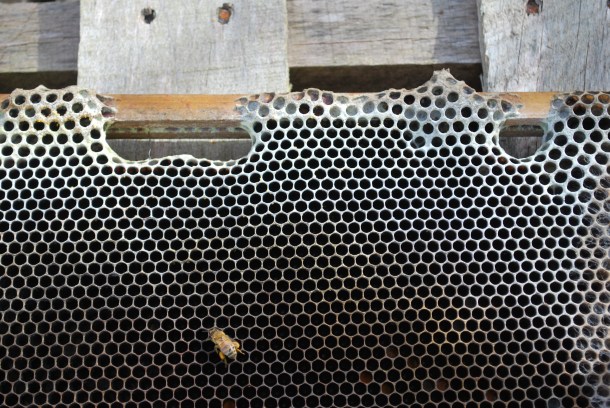
All three hives had capped and open brood that was concentrated in the top box. For this reason, I inverted all my brood boxes so that the top box was on the bottom and the bees could start to work upward as they seem to prefer to do.

DSC_0025.JPG

A dirty bottom board after a long winter

DSC_0012.JPG

Cleaning up

DSC_0023.JPG

Moldy comb. A strong hive will clean this right up and use it with no problems

All the bottom boards were extremely dirty and needed a good scraping or replacing. It felt really good to get all that detritus out of there as it’s just a breeding ground for pests and mold. My hives were a little damp inside, even to the point where I saw some slugs hiding out and some mold on a few unused frames. I think I really have to get going making and installing quilt boxes and screened bottom boards to improve the airflow situation.

DSC_0006.JPG

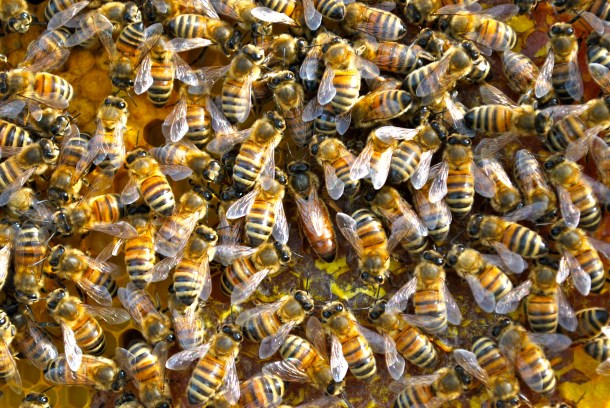
You can see two shiny brown varroa mites clinging to the back of the bee near the middle

Sadly, I did notice varroa mites in all three hives after a whole year of not seeing a single one. Hive 1 had some visible phoretic mites while the other two had mites revealed in some of the capped brood that was broken when I removed frames and cross-comb. I’m thinking of trying a powdered sugar treatment regimen but am still in the research stages of figuring out efficacy. I’ll also need to install screened bottom boards first. I don’t like the ones available for sale locally so I’m working on my own design, which I’ll share in an upcoming post.

DSC_0014.JPG

Hive 2’s queen

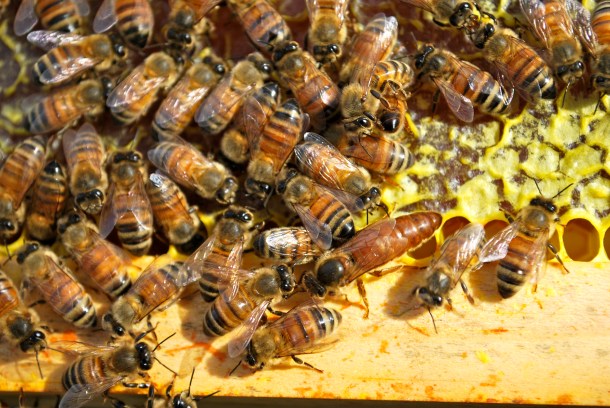
A lovely surprise was coming across two of my queens totally by accident! I wasn’t even looking for queens, just checking for eggs. I guess all the research I’ve been doing over the winter has made me better able to spot them because they really jumped out at me, visibly. Hive 2’s queen was looking a little small to me compared to the big feral mated queen from Hive 3. Not sure if that will become an issue or not. I know the smaller queen is older and this hive has the smallest population, so we’ll see if it’s prudent to requeen this year or not.

DSC_0035.JPG

Hive 3’s feral mated queen

DSC_0034.JPGDSC_0032.JPG

One hive had a little bit of drone brood started, and I added an empty frame to each hive so they can build more. This will allow me to do drone trapping which will help with mite control. It also means that it’s almost swarm season and split season. Yay!

DSC_0040.JPG

A little bit of bullet-shaped drone brood at the top of the frame

The biggest job was scraping off all the burr comb and built up propolis so the frames would sit neatly once again. I was actually hoping to get stung during this work as I’ve been told that getting stung more will help build up antibodies and make me less susceptible to developing a bee venom allergy. Even my most defensive hive refused to oblige me though so I may have to start taking matters into my own hands, literally. At least stinging yourself gives you the option of where you get stung!

DSC_0037.JPG

Some broken drone brood

During the frame cleaning some capped brood was inevitably broken open. Never a happy thing but it gave me a chance for something I’ve been wanting to try, which is tasting bee larvae. They have a nutty, slightly sour taste. Not particularly unpleasant. I’ve read that the reason bears try to break open hives is primarily to get at the protein-rich brood while the honey simply serves as a nice dessert.
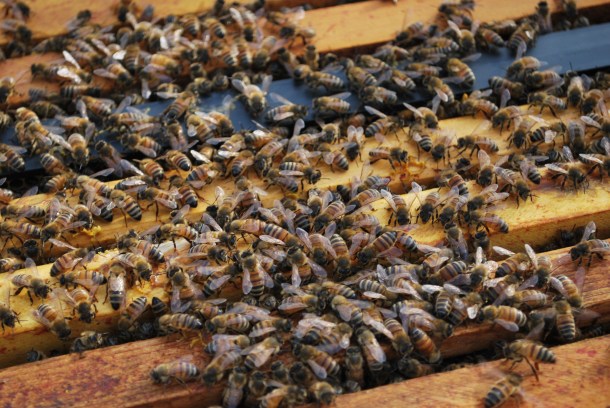
DSC_0010.JPG

Happy bees!

DSC_0047.JPG

Bring on the 2017 beekeeping season! 🙂


New Dehydrator!

DSC_0002.JPG

My old cheap, round white dehydrator from Canadian Tire served me well for a few years, but the plastic trays finally crumbled and fell apart and it needed to go. I do a fair bit of dehydrating and decided it was time to invest in a better quality model, so I went with the 3900B 9-Tray Deluxe Excalibur.

I’m not sure why a plastic box with a heat element, thermostat and fan is so expensive, but all dehydrators of this size and quality seem to be comparable in price. At least this one has lots of great reviews. It’s definitely got a lot more capacity than my tiny round one did, and it’s a bit easier to clean. So far here’s what I think of it:

Pros:
-Large drying capacity
-Square, easy to store and easier to arrange items
-Seems fairly durable
-Adjustable thermostat
-Relatively easy to clean*

Cons:
-Expensive
-No timer
-Tray are a bit flimsy
-Door does not latch shut
-Large footprint
-*Still annoying to clean

The door just hangs on the front which would be fine if I didn’t have cats and often dry meats. This means if I’m not supervising I have to put something heavy in front of the door to deter cat theft.

They say you can wash the trays in the top shelf of your dishwasher IF you take them out before the drying cycle. I don’t know about you, but me and my dishwasher don’t really know each other all that well and I’d rather not take the risk of melting my trays. This means I have to scrub the 14″ square trays in my sink and well, they just don’t fit. It’s awkward, water gets everywhere, and I hate it. At least I can dry the trays when I’m done right in the unit!

If I had wanted to spend another $40 to $50, I could have purchased a model with a timer. However, I can just buy a timer for $10 and plug into that if I need one. I think I would rarely use one anyway, and the built-in timer only goes to a maximum of two hours, which generally isn’t enough time for what I’m drying. It’s also just one more thing that can break on the unit, so I decided to go without. Looking forward to drying lots of garden herbs and vegetables this year!

DSC_0003.JPG

Easter Sunday Rabbit Road Trip (Plus Tiny Chicken)

DSC_0011.JPG

We were contacted last week by a local retirement home that desperately needed some bunnies for their Easter party, since they had advertised it everywhere and their previous bunny wrangler had backed out.

DSC_0013.JPG

We agreed, and spent a few hours today introducing some of our rabbits to a very enthusiastic bunch of seniors and their grandkids. As a special treat, Tiny Chicken the Old English Game hen came along as well.

DSC_0008.JPG

The bunnies did very well and were very well-behaved being placed on so many strange laps for photographs. They enjoyed their spacious box filled with treats while the kids gave them lots of love and attention.

DSC_0002.JPG

Tiny Chicken surprised me by being the best behaved little chicken I have ever seen. She sat quietly while being petted, picked up, loved and hugged by dozens of kids. She never once tried to fly off even though she is an excellent flier, and just calmly trusted that I would not put her into a dangerous situation. I’m very proud of her and now I know I can bring her to events with no problems. She was a huge hit.

DSC_0007.JPG
DSC_0006.JPG
DSC_0004.JPG

We couldn’t have done it without the help of our lovely Miss Nanaimo contestant who was stationed at the bunny pen making sure everyone was gentle with the animals. Thanks for a great day!


My Coturnix Quail Eggs are Too Big!

DSC_0021.JPG

Standard quail egg on the left and one of my typical eggs on the right

It’s that time of year again when I do my first big quail hatch of the season, so I’ve been dutifully collecting eggs and placing them in the turner in a cool place until I have enough to incubate. I get about 12 to 20 eggs a day so it takes about a week to fill my turner up with the best eggs. But there’s a problem this year… My eggs are way too big!

I’ve come back to the turner to find crushed eggs almost every day now. The quail rails on my Hova-Bator turner are just not large enough, and when the turner goes all the way to one side, the largest eggs get crushed by the edges of the rail next to them and fall through making a huge mess.

DSC_0022.JPG

Regular untrimmed rails

I know this is not the worst problem a person can have… I select for large birds and I guess I’ve finally reached a point where their eggs have outgrown the turner. These are not double yolkers either, they are just very big. It was getting so that less than half of my daily egg collection would fit in the rails safely. But I wanted to hatch out those big eggs, they probably have big chicks in them! What was I going to do?

Solution: Trim the rails. It turns out that you can make some simple alterations to the plastic rails with a Dremel tool that allows for even very large quail eggs to fit without being crushed. The integrity of the rail is maintained, and it’s quite easy to do. In fact, the rails really should have been designed this way to begin with!

DSC_0003.JPG

Two bottom rails have been notched

DIY Swarm Trap/Nuc Box

DSC_0004.JPG

When I moved here, the garage contained a waterlogged, rotten old plywood workbench that I ripped out right away. It was super gross, but there were still a few pieces of wood that looked salvageable. I let it dry out really well and was able to turn what was left into two lovely little nuc boxes!

Since I don’t have any nucleus colonies to house in them right now, I’ve set them up as swarm traps. They each contain five medium frames that have been worked on by my bees last year (so they smell good to scout bees), and a lure, which is just a drop or two of lemongrass oil on a q-tip, in a small plastic bag.

They’re a bit small to be ideal swarm traps at 20 litres, as bees prefer a volume of about 40 litres (the size of a deep brood box), but it can’t hurt to try! Ideally, you want them in a sunny location at least ten feet up off the ground. I check mine every day and I love that I can make something useful out of something that seemed destined for the burn pile! I’ll post the exact measurements and instructions on how to build this nuc box at a later date, stay tuned!

The Broody Banty Experiment

DSC_0030.JPG

I have a very determined little hen who has her heart set on hatching out some chicks this year. I don’t really need more chicks right now, but I’d like to see if she can do it.

All the chicks I’ve raised so far have been by artificial brooder and I’d love to watch a mama hen take on the job. I think it would be even more entertaining to see a bantam hen hatch out full sized chicks and boss them around even when they get bigger than her!

There’s always a market for chicks and layers around here so I think I would probably end up selling them unless I see one or two I like. I don’t want any expensive eggs for this, just some barnyard crossbred mutts are fine. I think I’ve located a source of fertilized eggs at $10 per dozen and that seems a fair price.

DSC_0031.JPG

First I’ve got to make sure she’s really serious about this. I know she’s serious but she has to be SERIOUS. For this, I’ve brought out the big guns. Fake eggs. These are some ceramic eggs I ordered off eBay some time ago and they look and feel exactly like real ones. I set them up in the nestbox for her and she was on them in minutes. Once she’s good and settled for a few days I’ll move her in the evening to a small seperate pen with everything she needs and give her the real deal. Then we wait!

DSC_0032.JPG