Two Male Peregrine Falcons, a Juvenile and an Adult

DSC_0033

Just wanted to share some shots of two birds I worked with today. Above you can see a superb little male peregrine falcon, who is still young and sporting his rusty brown juvenile plumage.

DSC_0032

DSC_0034

Compare him to this adult male peregrine, with his much different creamy beige and pale blue plumage. Stunning, isn’t he?

DSC_0038.jpg

DSC_0041

Two undeniably gorgeous boys.

Rat’s Nest and Cooper’s Hawk

DSC_0004

Yesterday while I was working outside, my dog was also hard at work. We have a couple of rats that have dug some burrows near the chicken coop, and she has been diligently trying to excavate them. She was extra intense about her task yesterday and it wasn’t long before I heard the telltale squeaks of baby rats. I went over to see that she had uncovered a rat’s nest containing seven baby rats, about a week or two old.

She pulled them out one by one, dispatched them each with a quick bite, and continued her search for the adults. I am very pleased that there are now seven less potential rats living here and I hope mom and dad rat have been reminded yet again that this is not a safe place to set up house.

DSC_0003

The baby rats were tossed onto the compost pile, and the next morning I awoke to see what I think is a large female Cooper’s hawk perched on the edge of the bin. She is a young (passage) bird as you can tell by her juvenile plumage. This is the first time I’ve seen a hawk of any kind in my yard and I quickly grabbed my camera and got the best shots I could, which are unfortunately not very good. I’ve definitely been spoiled by being able to photograph raptors up close at the Raptor Centre. Anyway, at least I have some evidence of her visit!

DSC_0004

When I went outside a little bit later I noticed that all seven baby rats were gone from the pile and I assume she ate them. I’m glad she was able to get such a good meal here and I’m once again happy I do not use poison as rodent control.

If you’d like a more up-close shot of a passage female Cooper’s hawk, I just happen to have one here for you:

DSC01050


Introducing: Champagne d’Argents

DSC_0006

We have a new breed here at Abernathy’s!

This lovely young pair of Champagne d’Argents were dropped off today by a very reputable breeder operating out of Victoria. I met her last summer at the Vancouver Island Exhibition, and have been waiting for a suitable pair to become available ever since.

There was a lot of interest in these bunnies so I was very lucky to snatch them up. The buck has even won a grand champion leg already, and of course they are fully papered and pedigreed.

The Champagne d’Argent is an old breed that originated in France almost 400 years ago. Along with the Creme d’Argent, they were initially bred for their fur, but are now bred mainly for meat. They have been called the “black angus” of rabbits and are purported to have a tenderness and flavor that is superior to other breeds, as well as an excellent grow out rate.

They are also great mothers, very calm and sweet rabbits and of course they are beautiful. They do very well on forage which is a big plus for me since I offer a lot of wild greens in the warmer months. This pair do not have names yet, but are already settled into their freshly scrubbed new cages and seem quite content.

I’m now at maximum capacity here and I’ll need to build some new cages soon. I may sell my Californians. They are excellent rabbits with very good personalities, but they were supposed to come with pedigrees and the breeder never provided them. There’s now no way for me to get their papers and unfortunately I only want to deal with fully papered rabbits at this point. We’ll see what happens.

DSC_0002

First Raised Bed Filled

DSC_0003.JPG

I took a couple of hours today in the sunshine to fill up the first raised bed I built. I need this bed filled before I can start on the other beds, because there are a few things that need transplanting when I clear the area, like my leeks.

The entire top half of this bed was filled with earth taken from my chicken pen floor. A little over a year ago my lovely boyfriend dug out the pen about a foot deep and we filled it in with wood chips. These did a really good job of keeping the mud down and providing the chickens a loose surface to scratch. It also mixed with the droppings and broke down over time into beautiful, rich black earth.

DSC_0001.JPG

It’s time to dig it out again and put in another load of wood chips, and luckily I had the bed ready to be filled. I probably transferred about 20 wheelbarrow loads out of there, and there’s easily another 20 to go which is good because I’ll have another two huge beds to fill soon.  The chickens were beside themselves with joy at the layer of worms and fresh earth I uncovered for them.

I loaded it right to the brim as it will settle with time. I also plan to top dress it with some finished fish compost that I have left over from last spring. I can’t wait to get planting!

DSC_0002.JPG

Peregrine Falcon on the Glove

DSC_0001

I wanted to share some shots of one of our female peregrine falcons being manned while hooded. The hood works because in most birds, their instinct when it gets dark is to become quiet and still. This is also where the term “hoodwinked” comes from. This little girl is so serious, she’ll sometimes try to fly while hooded! Not good.

She may be naughty sometimes but she sure is pretty.

DSC_0002DSC_0003


First Big Chicken Hatch – Day 1

DSC_0001

Last year I incubated a dozen blue-green eggs I bought from the poultry swap. I had to turn them manually because my turner couldn’t accommodate both quail and chicken egg sized racks at the same time (boo!). Only three hatched, two were roos, and I was left with a single Ameraucana hen who is now the White Chicken.

This time we are doing things properly and using the egg turner. Somehow, I have coordinated three types of fertile eggs for this hatch, and we have a completely full tray of 42 eggs.

First I have black Old English Game bantams which are the small white eggs. There are ten of these and they were from the same person who I got Tiny Chicken from. They were free, but there will be trades happening in return for them later on. Considering the size of the birds these eggs came from, they’re pretty big! We all know how much I love Tiny Chicken and I wouldn’t mind a couple more like her. She is small enough to be allowed to free range without damaging plants,  and she has an awesome personality.

Then we have the light brown eggs, which are from a mixed flock of Cochin and Light Brahma that I met at the farm I was getting my new Standard Rex breeders from. They were $10 per dozen and I’m only setting 20 of them because of space constraints. They are a beautiful mix of colors and should be interesting birds. Cochins are the large breed from China that spurred “Hen Fever”, the chicken fad that swept across America and Britain in the 1850’s, inspired by Queen Victoria’s own aviaries.

The gorgeous dark brown eggs in the middle are Welsummer or Welsumer eggs. They were purchased from a nearby breeder and cost $30 per dozen. Yes I know. The eggs are rather small and from young birds, so that may be an issue. When I was picking them up the seller also mentioned that her birds are quite small, and I’m not sure if that’s standard for the breed. The Welsummers that I had last year seemed around the same size as my other large fowl, so we’ll see how it turns out. I do like those dark brown eggs!

Of course, there’s no way I can keep all these chickens. My plan is to sell or trade off almost all of them and only keep a few of the nicest hens to refresh my stock. The Welsummers can be sexed by color and I’m hoping to successfully feather sex the Cochins at hatch. The females should have longer wing and tail feathers than the males. This may work with the bantams too, I’m not sure. I’m also not sure what I’ll do with all the males. I’ll have to keep some for at least a little while to know if my feather-sexing technique has worked. Nobody will want to buy them, that’s for sure. And if they start to crow, they have to go.

I did try to find more Ameraucana hatching eggs, but the only person who responded to my ad was selling them for $40 per dozen. For that, I can buy a pair of ready to lay Ameraucana pullets at the poultry swap. No thanks.


Controlling Rats in the Chicken Coop with a Weasel Box

DSC_0007

Eventually, unless your chicken pen/coop is built like a fortress, you will have rats. Especially in an urban setting like mine, where rats already exist due to human presence, the lure of eggs, chicken feed and sometimes even young chicks is too much for them to resist. A desperate rat will even munch on feathers and chicken poop.

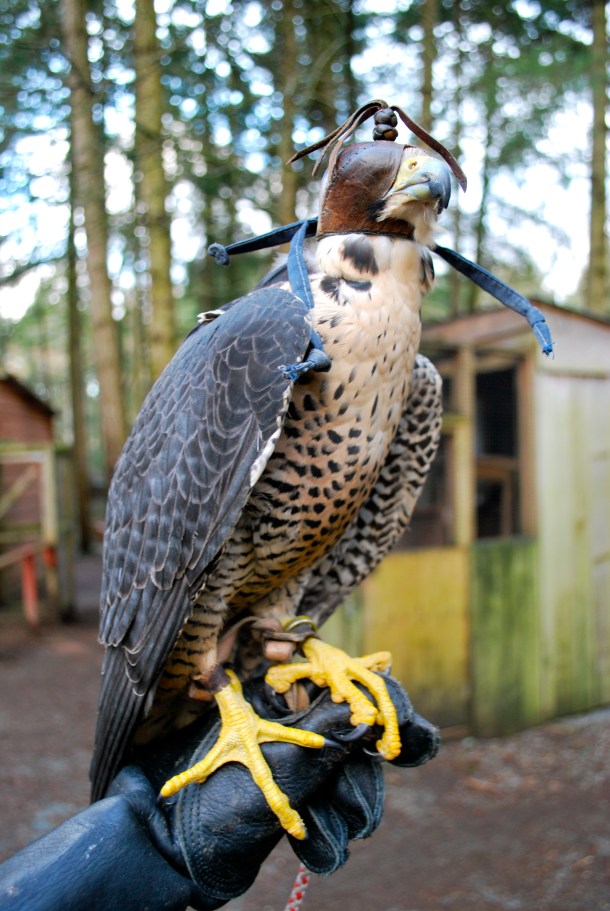
The best rat control of course is always a good cat or dog, but some rats are too tough for the average farm cat or too wily for the average dog. My cat Parsley is usually the RCO around here (Rat Control Officer), but she will often come home very beat up from a rat fight, with scratches on her little face, neck and ears from the battle.

My dog will kill a rat if she can catch one, but she comes inside at night and that’s when they’re most active. Between them we’ve kept our minor rat issue under control until now, but now we have a special rat who refuses to be caught.

This extra intelligent rodent has decided to dig a maze of burrows underneath my chicken pen. It knows that the cat and dog can’t get at it if it comes out only inside the chicken pen at night, which is fully enclosed but does not have a wire mesh floor. It stays cozy and snug in its burrow by day, and raids the chicken and duck feed at night. The area around the pen looks like swiss cheese, and I never know when the ground beneath my boot will sink into a rat hole. Parsley has come home more than once with torn ears from battling this menace.

Now this particular rat has also developed the audacity to begin stealing eggs. Even though there is always an abundance of feed and grain inside the coop, this rat has cultivated more refined tastes. I have a basket hanging on the outside of my coop that I use to collect quail eggs. I usually bring them inside but some nights I forget. Just the other day, I noticed two quail egg shells laying on the ground that looked peculiarly like they had been nibbled open. He had climbed up, stolen two eggs out of the basket and eaten them at his leisure. Time to get serious!

The issue with catching rats inside a coop full of birds or in a yard with a lot of small pets around, is that you don’t want one of your cats or chickens getting injured by mistake. Rat traps are serious business and they could easily crush a delicate paw or feathered neck. I won’t even get into using poisons, as that can be even more dangerous for pets or wildlife who may later consume a poisoned mouse or rat. No, I want to use a good old fashioned Victor rat trap, but it needs to be used safely.

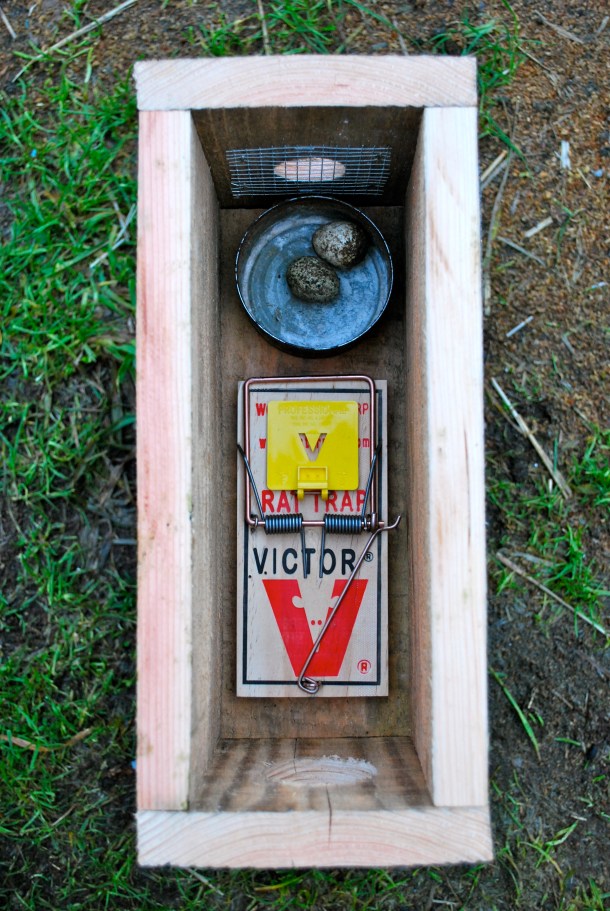
After doing a little research I came across the idea of the weasel box. A weasel box is a little wooden box about the size of a large birdhouse, that is used with bait and a trap inside to catch weasels. It has a hole at one end for the weasel to enter, and a smaller hole at the back covered with wire mesh, so air can flow through the trap, wafting the scent of the bait out and also reassuring the weasel that there is an escape route.


Now I’m lucky enough to not to have weasels where I am, but one day I plan to get a larger and more rural piece of property where they will no doubt be an issue. Until then, this seemed like a perfect solution for my rat problem. I built it in one evening, purchased my rat trap and set it up near the base of the coop, baited with two fresh quail eggs.

DSC_0003

I made mine with scraps left over from my fence construction, but you can easily build one with a single 1″ by 6″ wide , 6 foot long cedar fence board. Simply cut 3, 12″ pieces for the bottom and sides, one 17″ piece for the lid, and two 6.25″ pieces for the front and back. (Mine needed to be 7″ as my lumber was actually a full inch thick and 6″ wide instead of 3/4″ by 5.5″ like most dimensional lumber.)

The front piece should have a 2″ hole drilled slightly above center, and the back should have a 1.5″ hole drilled in the center, and covered with a square of 1/4″ wire mesh. I attached mine with a heavy duty staple gun.

It’s the perfect size to fit one of the large Victor rat traps. Put your bait next the mesh end of the box, and set your trap so the yellow or copper bait pad is next to it. This is so the rat doesn’t jump over the pad when entering the box, and also to keep the dangerous part of the trap as far away as possible from curious cat paws. If you have the kind of cats who like to stick their hands into hidey holes, you may have to attach an extender to the front entrance hole so they can’t injure themselves.


The rear of the lid should be attached with hinges, and the front can be fastened with a hook and loop type closure. I don’t have these parts ready yet, so for now my lid is held closed with a bungee cord. The trap is set up tonight for the first time, and hopefully I’ll be able to report its success very soon.

DSC_0005

First Raised Bed Complete

DSC_0001

I had to take time off after the last time I worked on this bed, since it got cold and the ground froze. Now it’s nicely thawed again and I spent a little while before farm chores today to finish it off.

It now has both its ends completed, two cross bars in the middle to keep it from bowing out, and I have ground down the tips of a few screws that pushed through the wood into the inside. The tips were barely visible, but I did not wish to be reminded of them later on while gardening.

DSC_0002

If you’re wondering how the thin ends of the triangular side pieces are attached, there is a block of wood inside securing them to the top piece.

DSC_0004

The bed is already almost half filled with rabbit manure, chicken manure, kitchen scraps and kitty manure. It will be good to get bed number two started soon, since I don’t want to overload them with fresh manure. They have only a few months before spring planting to mellow out, and I don’t want my plants to burn.

DSC_0003