Juggling Kits: Maximizing Survival Rates

Image

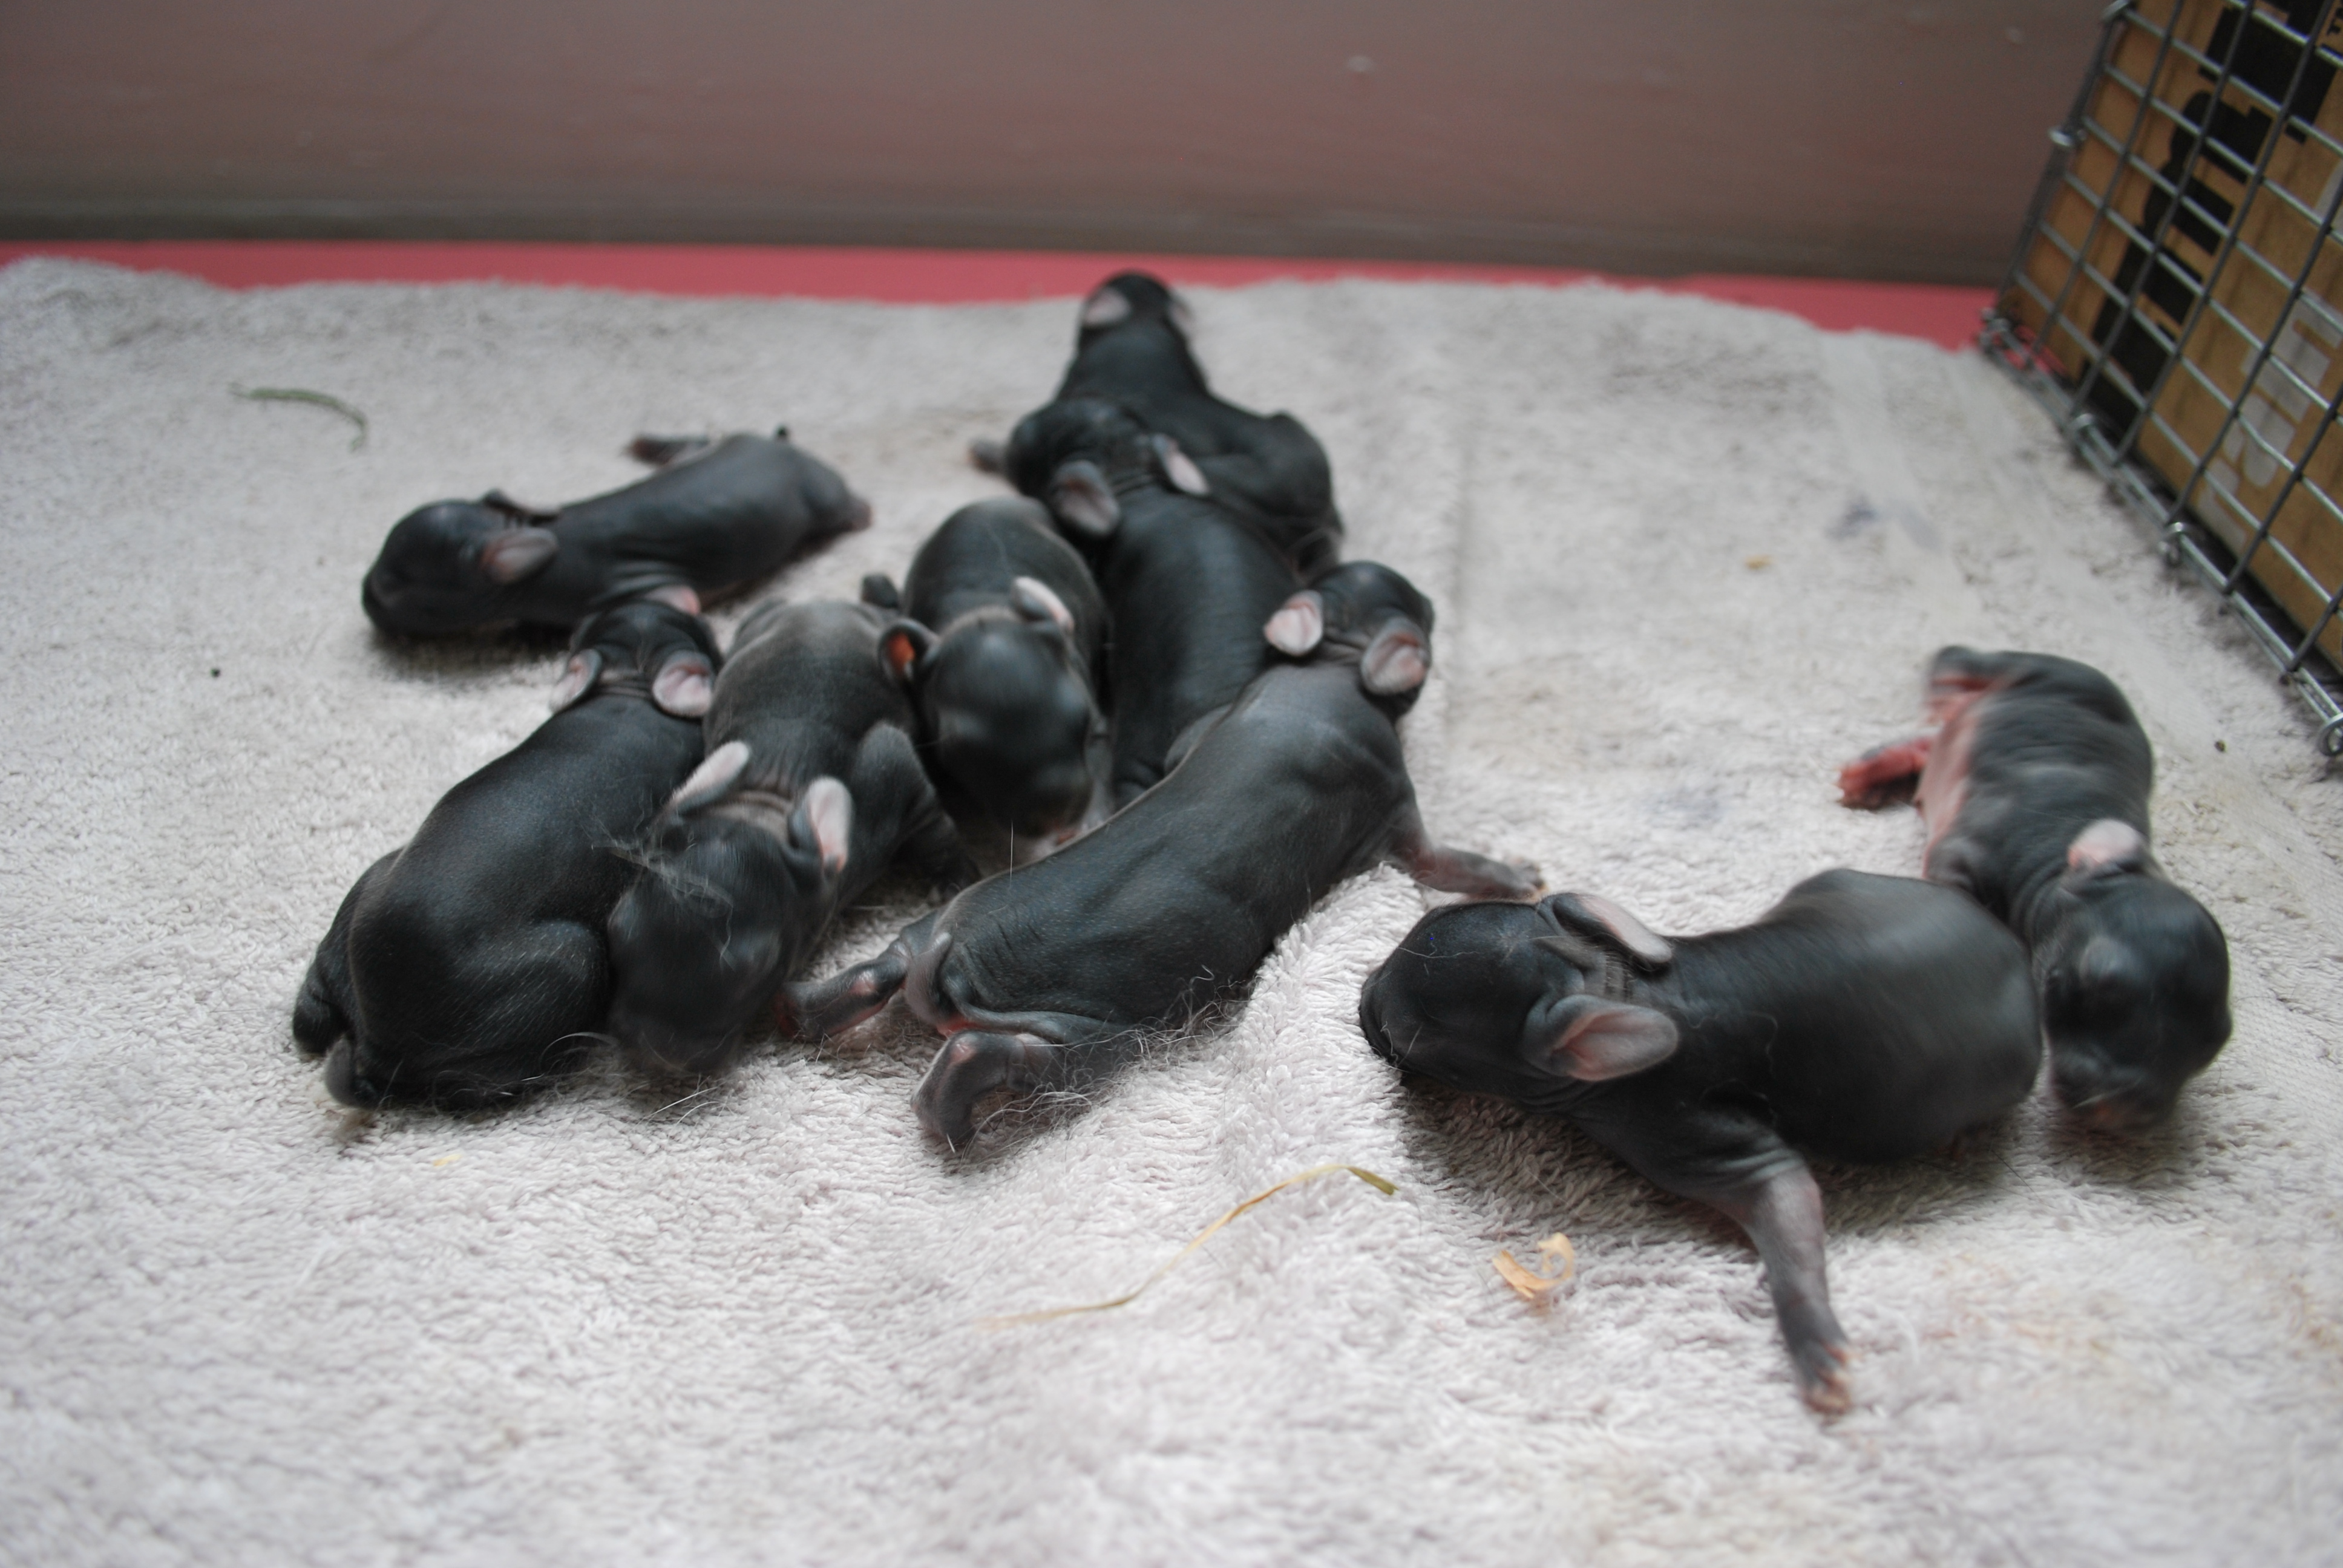
I know that rabbits only have eight nipples and nurse once or twice a day for short periods, so I wasn’t surprised that even our best mums had only managed to raise nine to ten at best, to weaning age, per litter. Often they have more than that, so we’re used to losing a couple, always the smallest ones. I didn’t really have a problem with this, I check nests daily and count kits, removing any dead ones. Dog treats.

But now I think I have a better plan. I already know to breed more than one doe at a time (or within a few days) in order to give myself options. Since our latest trouble with Tuna’s first litter, I’ve developed a process for juggling foster kits. You don’t even really need two does with litters for this trick, but it helps.

Now, don’t let anyone tell you that rabbits will not take care of kits that smell different. Maybe some high-strung rabbits somewhere would kill foster kits, but in my experience does don’t even notice. As long as it’s her nest with her fur in it, the kits should be fine. Check daily and relax. Do not switch nests, just kits.

This method will allow you to raise more rabbits than you normally would with just two does. I consider 9 kits per doe to be more than average, but I think you could raise up to about 24 kits per two does, to weaning age.

Day 1

1. Wait 24-48 hours after both litters have been born and have been fed at least once (it’s ok if some kits look underfed).
2. Start in the afternoon, as most rabbits nurse in the evenings. Remove the biggest kits from both litters and place in warm holding area for 24 hours. Choose only biggest, fattest kits. They should be obvious.
3. Place all smallest kits (up to 8) in nest box of largest, most capable or experienced doe. If kits are very small and thin, add only 6 of them.
4. Place all secondary, or mid-sized kits (up to 8) in nest box of lesser experienced/smaller doe.

Day 2

1. Add fattest kits to smallest doe’s nest.
2. Put secondary kits in warm holding area for 24 hours.
3. Leave smallest kits with largest doe.

Day 3

By now the smallest kits should be looking good and everyone should be alive, if not huge. If smaller kits are still struggling, repeat the juggling of the fattest and the secondary kits for another 2-3 days. Then use your best judgement and split the litters evenly between the two does. In the first two weeks you can always remove the largest kits and put them away for 24 hours (maximum) to allow malnourished kits to catch up.

Bunnies want to live, and they will if given a chance. They might not grow as fast but they should survive. Once they’re weaned they can eat to their heart’s content, so it’s really just about getting them to that point.

Lactation Issues

Image

These day-old kits do not yet show the full fat tummies that prove they are feeding well

After all the excitement of getting our first Standard Rex litter after almost a year of trying, things started to go wrong, fast.

Tuna did everything right, she pulled fur, she had her kits inside the nestbox, she cleaned them up. So far so good. After the first 24 hours the kits were all still alive, but it was obvious that they were not being fed. Their bellies were wrinkled and shriveled, but they were still very active. Ok, first time mom, let’s give her another day. That evening I even went in very late to check on her, and she jumped in the nestbox to “feed” and tend to her kits, right in front of me. Something none of my other does have ever done. I was hopeful. The next morning however the kits still looked emaciated and the runt had perished.

I took Tuna out of her cage and sat with her on my lap while I tried to allow her kits to nurse. They went frantically from nipple to nipple, seemingly getting nothing. Maybe Tuna wasn’t lactating yet? Good thing Rosalind also kindled a litter recently, so at least I have options. I filled up Tuna’s hopper with pellets and whole oats and went to the feed store for KMR (kitten milk replacer) and a baby bottle. I have access to whole goat’s milk as well but wanted to try the KMR first as it seems richer.

Thus began my first adventure with hand-feeding newborn rabbits. I mixed up the warm formula, set up a towel with a heating pad underneath and some warm wet washcloths and went to work. I started with the smallest kit and began by wiping the genital area to stimulate excretion. Once I got a little stream of pee, I went ahead with the feeding. Despite how eager they were to search out nipples on their mom, they weren’t enthusiastic about the formula. They put up quite a fight, and I only got a very small amount in each one. It takes a long time. You have to be very careful that the liquid doesn’t get squirted into the rabbit’s mouth and that it doesn’t enter their nose. If they aspirate milk into their lungs they can get pneumonia very quickly and die. You will be feeding drop by drop and waiting for the baby to finish the drop before you offer more. When they start fussing and refusing, they are done. They need to be cleaned thoroughly with a warm washcloth so the dried milk doesn’t cause sores, and their genitals need another round of wiping. On to kit number two. Feeding all eight kits took probably about two hours.

Two hours. I’m a busy girl, there’s no way I can hand raise all these kits. Not to mention the success rate for hand-raising kits so young is very poor. I need another solution. Maybe Tuna’s milk will come in with a little encouragement? Time for a little nestbox juggling.

Luckily Rosalind has always been a great mom and she had a new litter too, born the day after the Rex kits. For once I found myself wishing she had produced a small litter so I could foster more easily. No such luck, she usually throws 9-12 kits per litter and this was no exception. Ten kits. Ok. Her kits looked very well fed for the most part, at least seven of them looked very fat and large. I removed these kits and placed them in a warm holding area and replaced them with all eight of Tuna’s starving kits. I put the nextbox back in with Ros around 7pm and left it there all night. The seven large Silver Marten kits were placed in Tuna’s next box for a few hours to absorb some of her smell and then placed in with Tuna. My hope with this arrangement was that Ros would give all the starving babies a good feed, while the strong babies could stimulate Tuna’s lactation with their more vigorous nursing. But would it work?

Well, I went to check on everyone this morning and was very pleased to find all starving babies with full, fat tummies. Good work, Ros! Even the kits left with Tuna look like they’ve been fed, albeit not much. Possibly since she’s a first time mom her milk is coming in late and there’s not a lot of it. I’m going to continue to free-feed her pellets and oats and hope that her production increases. In the meantime I will keep rotating kits to keep everyone fed, I hope. Can one rabbit doe provide enough milk to feed two large litters?

Our First Standard Rex Litter

Image

I had almost given up on Tuna. We attempted to breed her once she hit six months old at the farm where she was born. She lived with the buck for nearly three weeks there and then… nothing. Then we acquired Timmy, who was formerly a pet rabbit and also had Black Otter coloration. Perfect! The first time we tried to breed these two, again, we got nothing.

But it looks like the third time’s the charm! For a first-time mom, Tuna did a great job. By her attitude, I was almost sure that this breeding was going to be another failure. She didn’t look any bigger, and palpation seemed to show nothing happening. She kept her appetite up throughout the pregnancy and her demeanor was always the same. Sweet and lovely. In fact, she got even sweeter and more cuddly!

Last night she pulled fur, and had all nine kits right where they were supposed to be, in the nest box. All alive and well. Though we were expecting Black Otter, there look to be some paler kits in the bunch so that’s very exciting. Since Timmy’s background is unknown, we’ll just have to wait and see what develops.

Fermenting Feed for Chickens

Image

My current fermented feed setup

I’ve been making my own fermented chicken feed for a few months now, and it’s been a great success. The chickens and ducks love it, and consider it a special treat. I usually give my small flock about four small scoops a day in a little dish, and it gets cleaned up in about ten minutes. It has a pleasant smell, like unfiltered sake. Even the dog enjoys the few little grains that fall to the floor during preparation.

My recipe is simple. I just mix in whatever feed grains I have on hand, add a bit of kelp meal and then some water and give it a good shake. Right now I use corn, wheat, oats, barley, millet, black oil sunflower seeds and peanuts. Wild bird seed also works well. Over the next few days the grains lacto-ferment, which introduces Lactobacillus, Leuconostoc, Pediococcus, and other beneficial bacteria and yeasts into the culture.

Technically you can ferment normal pelleted or crumbled chicken feed as well, but I like to use whole grains. My poultry don’t usually get scratch, but sometimes I fill up the feeder with whole grains instead of pellets. I’ve never understood the saying that scratch should be considered “like candy” for chickens. I mean, these are whole grains. If I planted them they would grow. They store nutrients much better and are a lot less processed than commercial feeds, and I’m pretty darn sure commercial feed is made from processed whole grains, I mean come on.

You can start your fermentation jar or bucket by simply adding grains, adding water to cover and leaving it to sit at room temperature for about 3-4 days. Once it starts to smell sour and you see bubbles forming, then you know it’s ready; but even minimally soaked grain has improved digestibility by reducing the phytic acid and enzyme inhibitors found in all grains, seeds and legumes. Every time you remove some of the feed, refill the jar with more fresh grain and water and continue the cycle. In their lactic acid bath, the grains will be preserved indefinitely.

There’s enough natural lactic acid bacteria in the air and on the grains to get your culture going without adding anything else. If a white scum develops on the surface don’t fret, this is the scoby, and is normal. Just shake up the jar to mix it back in. The longer you keep your jar going, the more beneficial it becomes as the culture ages and matures, much like a good sourdough starter. It’s recommended to keep your jar covered and it goes without saying if you see mold developing, best to toss it out and start again.

Fermented feed has been found to increase egg weight and shell thickness, as well as boost intestinal health by forming a natural barrier to acid-sensitive pathogens like E. coli and Salmonella. It also lowers feed consumption due to more effective digestion, according to a British Poultry Science study from 2009. Another 2009 study by the African Journal of Biotechnology showed that fermented feed reduces the level of anti-nutrients found in grains and seeds, and greatly improves the bioavailability of vitamins and minerals during digestion.

Not only does fermentation preserve vitamins in grains, it also creates new vitamins, especially B vitamins like folic acid, riboflavin, niacin, and thiamin.

I haven’t noticed much of a difference yet in my hens but fermented foods have long been known to be conducive to good health in many species, including humans. I encourage you to give it a try!

Why Quail are Better Than Chickens

Image

1 week old Tibetan type Coturnix quail chick

Ok, I don’t really think quail are better than chickens, but I do think that they are vastly underrated.

The type of quail I have are Coturnix, or Japanese quail. They are a small, hardy gamebird that are very easy to raise and need very little space. Consider them as low-maintenance pets that are fun to watch and provide the added benefit of meat and eggs.

-They are ground dwellers who rarely fly and so require little headroom. 8 to 10 inches is sufficient. They also require very little living area, about one square foot per bird.

-Quail mature much faster than chickens. The hens begin laying beautiful, edible speckled eggs at approximately 6 weeks of age and continue to lay almost an egg a day for about a year or so before production slows. About 8% of their overall body weight per day!

-Quail meat is absolutely delicious, and quail are incredibly quick and easy to process. I can do one in about three minutes flat with a pair of kitchen scissors.

-Male quails don’t have a piercing crow like a rooster, it’s more of a wild-sounding trill which many people find pleasant.

-Quail eggs are very easy and forgiving for someone just learning to hatch. I’ve heard it said that you could probably leave quail eggs in the trunk of your car for a few weeks and they’d hatch.

-Quail eggs have more protein and nutrients than chicken eggs by weight, and are safely eaten raw. Not that I don’t consider chicken eggs safely eaten raw as well.

-They are friendly little birds who will come running when they see you approaching with dinner. I once had one lay an egg directly in my hand. Their feathers can also be used for fly-tying.

Personally, I think quail make ideal urban homesteading pets, especially in locations where chickens are not permitted. Their curious antics and beautiful plumage will suck you in just as much as their plentiful gourmet egg production. A perfect way to start? Get a trio of two females and a male. Now you have fertilized eggs that can be hatched out in an incubator to renew your flock when required, which is generally every six months to a year or so.

Image

Adult Coturnix quail

What Do You Get? Silver Marten X Creme d’Argent

This was something I researched a lot when I was first getting into cross-breeding rabbits but couldn’t find a whole lot of information. I wanted to see what the resulting bunnies would look like. There are lots of “cross-bred” rabbits out there but I’m talking about F1 hybrids which supposedly benefit from “hybrid vigor”.

I didn’t want to cross-breed necessarily but I wanted rabbit meat and it was my only option at the time. I actually found the coats of the offspring to be very attractive and wild-looking and the growth rate was good. The kits had very cute black eyeliner and ear tips.

So, what do you get when you cross a Silver Marten sire with a Creme d’Argent dam? You get this:

Image

Silver Marten X Creme d’Argent hybrid kit at about 12 weeks old, just prior to processing

A large brown rabbit that looks very much like you would expect a wild rabbit to look. Of course, that’s just what I got. I’ve had a few litters where the kits look consistently like this. A few end up a bit darker, but otherwise they look like agouti coats. I’m considering eventually keeping a doe for breeding and would mate her to a third breed, supposedly maintaining hybrid vigor. I’m definitely excited to try more hybridization in the future.

DSC_0067

Looks like agouti